I have been recently called to scouts. Yeah! I have been looking for items that I can easily print and work with the boys but sometimes, I can't find what I am looking for. Today we will be talking about tools and how to use them...and if I can get them to stay focused we will even use them! I made these flash cards to reinforce the hands on experience and purpose of each tool.
I hope you can find some use for it!
Wednesday, March 20, 2013
Friday, February 18, 2011
Casserole Carrier
A couple of years ago a friend brought a dish to a potluck in a homemade carrier. I thought it was fabulous and wanted to some day make one. A few months ago, I made Jeremy buy me some wooden dowels because I was going to get serious and REALLY make one!
I found this tutorial that was super cute at Moda Bakeshop
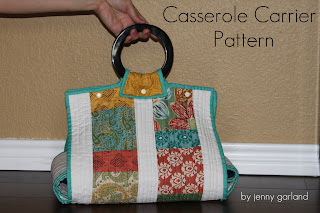 Then over at Homemade by Jill she had this one.

 The jean stripe is a pocket to hold a serving utensil. Then you unfold...
 and unfold again...

To get your casserole out. This was really easy and only took me about 3 hours, included doing some math, cutting and adding the flowers. So I would say this is a quick and easy project to just get some crafty juice flowing! On another note you can make it as a gift, personalize the casserole dish and make a matching hot mit! (I wish I came up with that idea but alas, thank you Jill at Homemade by Jill for giving me the idea!

I found this tutorial that was super cute at Moda Bakeshop

I was getting ready and decided to google a few more options. And found this tutorial at Babylock.com. I would not say that it is an excellent tutorial but it helped me get started and some general measurements. I think I still made mine too small, but it does work and I think it is really cute!


To get your casserole out. This was really easy and only took me about 3 hours, included doing some math, cutting and adding the flowers. So I would say this is a quick and easy project to just get some crafty juice flowing! On another note you can make it as a gift, personalize the casserole dish and make a matching hot mit! (I wish I came up with that idea but alas, thank you Jill at Homemade by Jill for giving me the idea!
Friday, November 26, 2010
Do you like feeling crafty?

Check out their website Silhouette America.
Also check out the following websiteds to increase your chance to win one of your own!
- How Does She?
- Sew Dang Cute
- Make It and Love It
- Homemade by Jill
- Colies Kitchen
- Infarrantly Creative
- We Are That Family
- Grosgrain Fabulous
- Thrifty Decor Chick
- The Idea Room
- NoBiggie
- Shanty2Chic
- Moms Review 4 You
- Love Stitched
- Decor Chick
- Tatertots & Jello
- Dollar Store Crafts
- Be Different...Act Normal
- House of Hepworths
- Our Best Bites
- Kara's Party Ideas
- A Beautiful Mess
- TomKat Studio
- Crazy Coupon Mommy
Monday, November 22, 2010
Diaper Clutch Tutorial
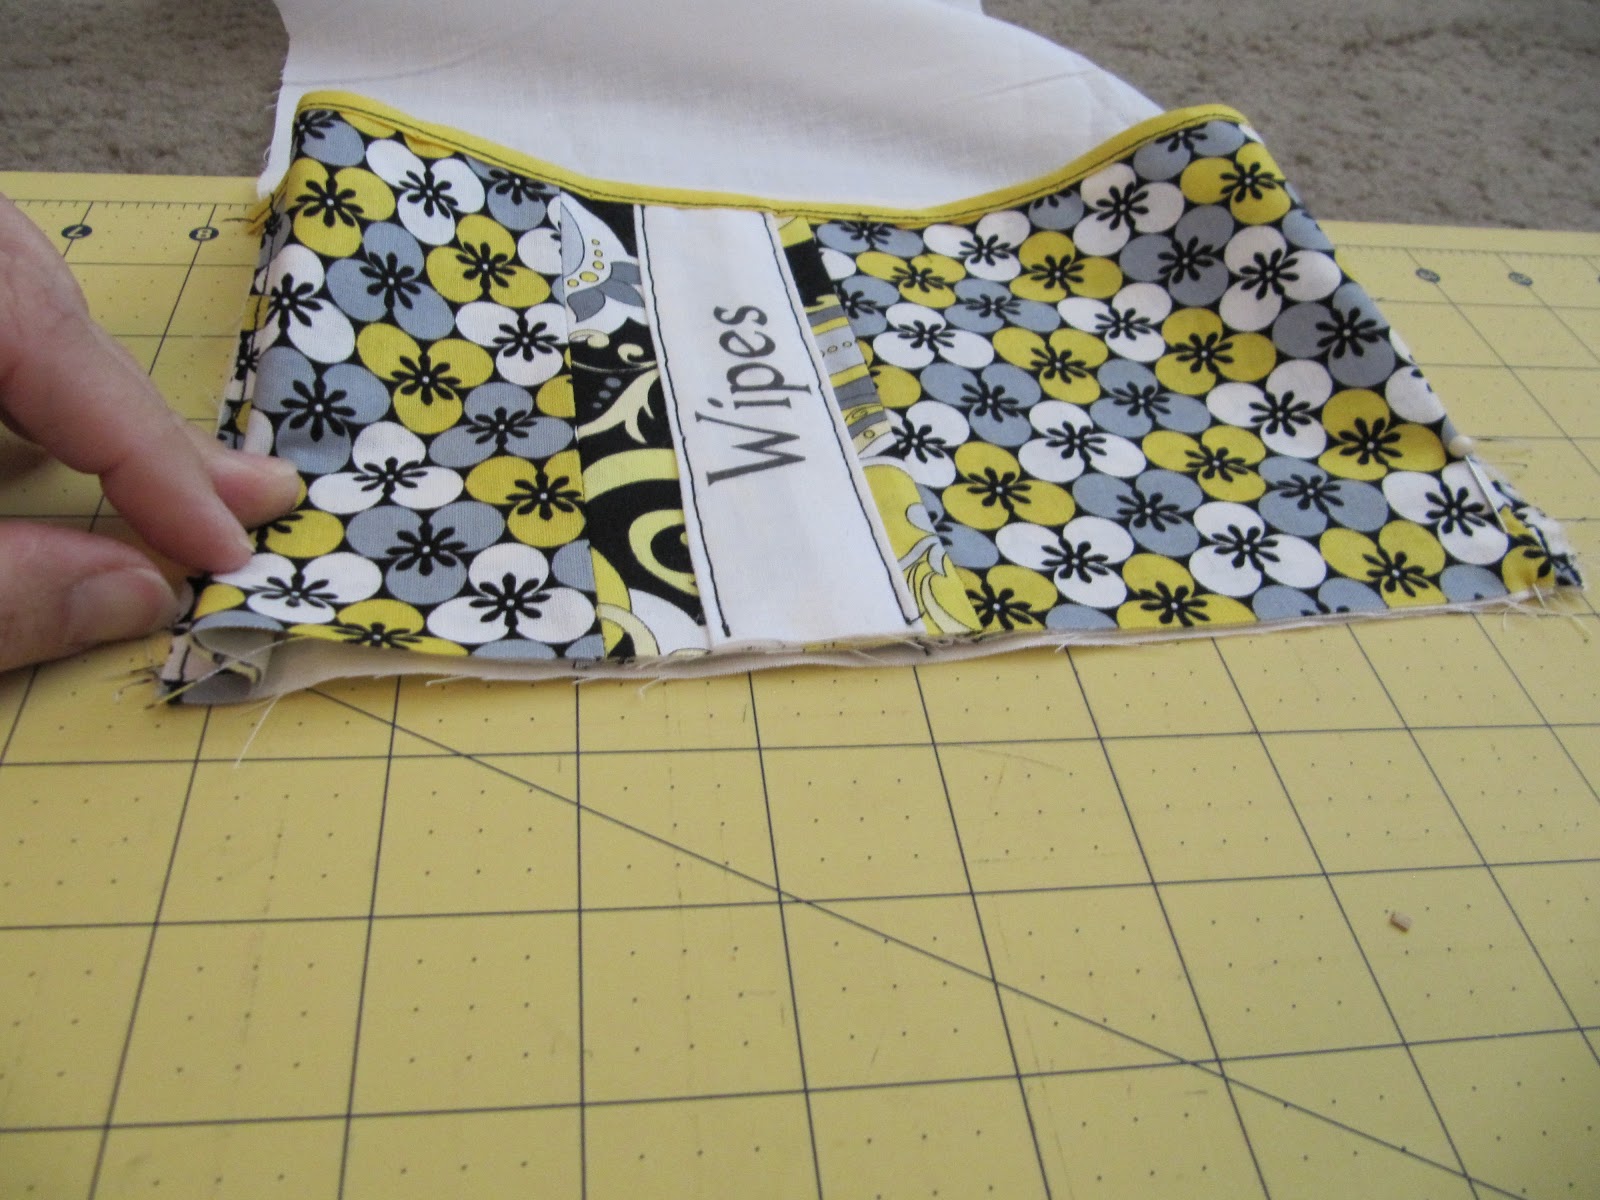
Here it is my very first tutorial. I have been asked how I make these but hadn't made two alike but I think I have mastered it enough to have workable directions! First we will do the innards! I decorated my wipes pockets. Take your wipe pocket and fold in half so it becomes 4.5" x11" The fold will be towards the middle of your clutch. I put binding on the edges to add a little something. If you would like to add the words you can use this product or follow the direction at the bottom. For the wipes pocket fold in half so you end up with a 6.5" x 5.5" pocket. Again I decorated it the same as the wipes pocket. NOTE: This pocket will hold two diapers (Size four gets real tight, so you may want to make your pocket 8" x11" folded in half to be 8"x5.5")
Take your lining piece and sew the top and bottom to the lining (I use about a 1/4" seam allowance in all directions!). You will end up with a whole like the picture shows.
 On each end you will do a dart. Fold pocket flat towards the middle 1/2" then fold a little back towards the edge and fold again towards the middle. It will kind of look like an "s". Then pin it and do the same on the other side.When it is pinned on both sided the pocket should lay flat.


 Sew the opening shut (note this should be three raw edges being sewn together), take out your pins and it should look like this:
 A side view:
 For the diaper pocket, lay your pocket piece right side towards the lining. It should be about 2 1/2 from the wipes pocket. Sew with a 1/4" seam allowance. Then flip the pocket over the seam so the wrong side is now facing the lining and "top-stitch" the pocket down.
 On the left of the picture below you can see what the left side looks like. For the right side fold your edge under 1/4" and pin to the lining. This should be sewn at 4" if using the pocket size I put in the example or 5" if you went with the bigger size diaper pocket.
 Pin the fold at 4 1/4" (or 5 1/4" if you did the bigger pocket) from the left edge of the pocket. You will end up with a hole like the other pocket.
 Pin a dart as you did with the wipe pocket and it should look like this.
 Sew the bottom. And you now have your completed lining.
 On the wipes picket I pinned the fabric towards the middle so I wouldn't sew the excess fabric in the side seam. In this picture on the left is the top of the wipe pocket and where my thumb is on the side (11" side) of the pocket. The fabric is pinned at a diagonal. You can kind of see that in the lower right of the picture.

Now is the assembly of the clutch!
Lay your batting down top with your outside piece with the right side up (away from the batting). Then put your lining on top with the right side (pockets) facing down. The wipe pocket edge will line up with the lining and outer material edge. The lining will be 3/4" shorter than the outer edge. You will want to center the lining. It will be about 3/8" on each side. Sew the lining and outer piece together.
For the bottom you will fold the edge to line up the edges of the material. Where my finger is you can see that the corner of the lining and out material is about a 1/4" further than the side you had just sewn, but the loose edge now lines up with the lining. Then pin the edge to ling up with the lining and sew until 1/2" for the right edge. Repeat on the other side.
 When you are done you will end up with a big pocket. with the batting and outer material bulging ove the lining.

 Turn the fabric so the right sides are facing out, press the edges and sew again in the seam (aka stitch in the ditch). It will now have about a 1/4" edging of the outer fabric on the inside.
 For your last edge, take the corner and fold down (on both sides). Then fold the entire side down 1/4". Then fold again. The first fold puts the raw edge towards the pockets. The second fold hides the raw edge. Pin it then sew as close to the edge as possible.

 For your velcro, you can place it in the middle of that edge. As seen below, I put the soft side on the lining (see below) and the stiff side on the out side if the wipes pocket (you can't see it in the picture below). I would recommend placing a wipe container and some diapers in your clutch before putting on your velcro to see where it should fit the best. I had stitched the velcro on. For decorative purposes only I hand sewed on a button on the out side where the soft velcro piece is.
Following this tutorial here by Handmade by Jill, I made a matching Diaper wipes case. I did find that I needed to make the material about an inch wider than what the pattern said. Maybe I didn't read the directions and that is what it says : )
Here is a photo of the finished project.

Diaper and Wipes labels (sorry no pictures)
You will need fabric, freezer paper, and inkjet printer and some tape.
On your word processor (or program of choice) type up what you what to print. Cut your fabric to the appropriate size. Cut a piece of freezer paper the same size. Iron the freezer paper and fabric with the wax side towards the fabric. This acts as a stabilizer when going through your printer.
Print your picture/word on a plain piece of paper. Then tape your fabric facing up on the paper, placing it exactly where your want it to print. Make sure you tape down the edge that will feed first into the printer and a little piece on the opposite edge will help. If you are working with a thicker fabric, you can cut both the freezer paper and material to 8 1/2" by 11" and feed that directly into your printer. Place in your paper tray according to your printer directions. My HP pulls from the tray with the side it prints on facing down, so that is how I would place it in my printer.
PLEASE NOTE: This has worked for me, but it has also jammed in my printer when the edges were loose. If you buy the expensive product, it will probably feed better. I would recommend staying close while printing so you can stop it before it gets too jammed. Just in case, but do this at your own risk.

Take your lining piece and sew the top and bottom to the lining (I use about a 1/4" seam allowance in all directions!). You will end up with a whole like the picture shows.


Now is the assembly of the clutch!
Lay your batting down top with your outside piece with the right side up (away from the batting). Then put your lining on top with the right side (pockets) facing down. The wipe pocket edge will line up with the lining and outer material edge. The lining will be 3/4" shorter than the outer edge. You will want to center the lining. It will be about 3/8" on each side. Sew the lining and outer piece together.
 |
| You are looking at the backside (wrong side) of the lining and the right side of the outer material is peaking out the top and bottom. You can not see the batting. On the left I have it all pinned together. |


Following this tutorial here by Handmade by Jill, I made a matching Diaper wipes case. I did find that I needed to make the material about an inch wider than what the pattern said. Maybe I didn't read the directions and that is what it says : )
Here is a photo of the finished project.

Diaper and Wipes labels (sorry no pictures)
You will need fabric, freezer paper, and inkjet printer and some tape.
On your word processor (or program of choice) type up what you what to print. Cut your fabric to the appropriate size. Cut a piece of freezer paper the same size. Iron the freezer paper and fabric with the wax side towards the fabric. This acts as a stabilizer when going through your printer.
Print your picture/word on a plain piece of paper. Then tape your fabric facing up on the paper, placing it exactly where your want it to print. Make sure you tape down the edge that will feed first into the printer and a little piece on the opposite edge will help. If you are working with a thicker fabric, you can cut both the freezer paper and material to 8 1/2" by 11" and feed that directly into your printer. Place in your paper tray according to your printer directions. My HP pulls from the tray with the side it prints on facing down, so that is how I would place it in my printer.
PLEASE NOTE: This has worked for me, but it has also jammed in my printer when the edges were loose. If you buy the expensive product, it will probably feed better. I would recommend staying close while printing so you can stop it before it gets too jammed. Just in case, but do this at your own risk.
Wednesday, October 13, 2010
Man's tie into boys tie
Following a tutorial at the best named blog ever...Hideous Dreadful Stinky. It tells you how to take a man's tie and turn it into matching ties for boys and toddlers. When I was finished I ended up with the three best dressed men. They make my heart go pitter-patter!
 And just to prove that the tie looks just as good after a long day here you go:


Shirt Re-Purpose
When Logan was two Jeremy and I came across a shirt that I insisted we had to have. It was $20 an unheard of price to pay for a t-shirt that he would out grow in a couple of months. What we didn't realize is that this shirt was WAY OUT OF PROPORTION! It was maybe the right length for a two year old but the width for a four or five year old. So I put Logan in it a couple of times then we packed it away for our future sons, which turns out to be son.
As Jackson is now approaching two we went through the old clothes and came across this t-shirt. I knew I would never put Jackson in it though I love it. I thought since I am mildly crafty I could cut it apart and applique it on something. Then I realized it was too girly to do that, so I tried the shirt on the girls (yes the 3 year old who is the size of a 5 year old and the almost 6 year olds) besides the length it fit well so I decided to make it into a dress.
BEFORE:


AFTER


Friday, September 17, 2010
Frames and Silhouettes
Remember a long, long time ago in a galaxy...well this galaxy actually I bought some frames at the dollar store. These frames found here, for 25 cents! I wanted to do silhouettes of my children and try my hand at refinishing the frames. They didn't turn out perfect because I do not read directions. For $1.50, directions are totally over-rated! WEll this week I got my rear in gear and finally finished my project and actually hung the frames.
 I love it! Another fun way to show off my most precious possession!

Subscribe to:
Posts (Atom)